Category Archives: Packaging

School fundraisers feature student artwork

OLMCS - Student art cards for sale in 2010 fundraiser

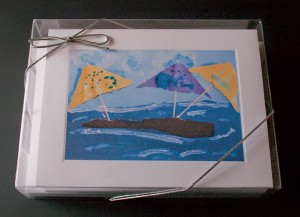
Our clients have great ideas. The mom’s at Our Lady of Malibu Catholic School decided to sell the children’s artwork as card sets for this year’s fundraiser. They printed up the cards, but were not sure how to package them. Following a little internet research, one of the moms visited us, wanting to see our clear plastic boxes. After trying a few different sizes to fit both the envelopes and cards in the same package, the result was a professional product for sale, worthy of any store or boutique. And economic too! In addition, the clear packaging allowed them to print a page to insert in the bottom of the box, profiling the artist and showing the prints enclosed.

Congratulations to all the budding artists at OLMCS, who now have the distinction of having sold their artwork. They are off to a great start.

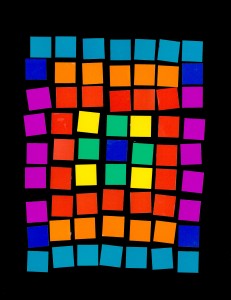
Past clients include public and private schools, and Sister Cities International, which features artwork from children around the world. Take a look at some of their artwork. Perhaps it will inspire you. To check out packaging options, see recent blog article “Greeting card sets – a great marketing idea!” by David Heyman.

"Great Harvest" - ©2008, Sister Cities

"Quilt" - Weathersfield School

"Lions" - Montgomery High School

Get your business card noticed

By David Heyman

Business cards are such a common marketing tool that many times they lose impact, are easily lost or put in a drawer and the design of many of them is quite forgettable.

Take this under-utilized advertisement of your business to the next level with some simple tips to make sure that no one ever tosses away your business card again:

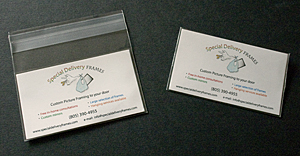
  • Put your cards into a clear business card sleeve. When sealed, this will protect your card from dirt and fingerprints, and ensure that your smooth, plastic coated card stands out in a pile of business cards.

Unsealed and sealed bags with business card

  • To make an even bigger impact, use a piece of foam core to back your business card inside a sleeve. This adds depth, and such an inherent value to your card, that no one will think of throwing it away! Continue reading

What is a Protective Closure Sleeve?

By David Heyman

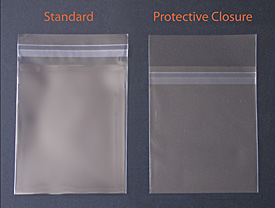
Crystal clear sleeves have an adhesive strip to seal the bags against dust, dirt, bugs and fingerprints, keeping your greeting cards and photographs in pristine condition. This adhesive strip is the key difference in a protective closure style sleeve.

Standard and protective closure sleeves

With standard sleeves, this adhesive layer is on the back of the flap. Simply pull off the cellophane liner, fold the flap over and the bag automatically seals. This works well for most uses, as the sleeve is protecting your contents, while allowing for removal of the item if necessary. Your cards or photos can be changed out, as the sleeves can be re-sealed several times. Continue reading

How do I measure my artwork for matting?

By David Heyman

A mat makes any image look more professional. Even without a frame, simply matting your photographs or artwork will do wonders for the presentation, and sales potential, of the work.

Although mats come in many standard sizes, if you are working with custom size images, or anything that is done on a paper that is a creative size, your mat will need to be custom cut. Oak Creek Printworks offers custom cut mats, at a cost relative to a standard size mat, with no extra charges.

How to give the correct measurements for a custom mat is one thing that many artists find confusing. Since custom cut mats are cut to order, it is important to have your borders and window measurements accurate. While you can always call David, our custom picture framer, at (805) 390-4955, with any questions on sizing of borders and windows, the following is a guide that will give you reliable results:

  • Measure the outside edges of your image. Do not assume your image is a certain size. You may have ordered an 8″ x 10″ photograph, but the image actually measures 7-7/8″ x 9-7/8″. If you are matting artwork on paper with an uneven edge, such as a deckle edge, measure the narrowest part of the horizontal and vertical sides, as shown in this photo.

* Add photo of deckle edge watercolor paper, showing w/ ruler how to measure*

  • Decide if you want even borders for your mat, or a weighted edge. Some people feel that having the bottom border of the mat slightly wider makes the image seem more centered when viewed from a distance. This is called an “optically centered” window.

CenOPCenMats2

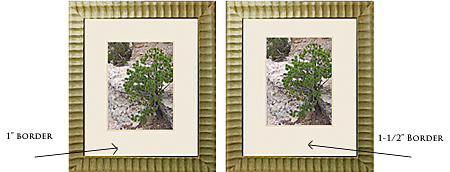
  • How wide do you want your mat? A narrow mat allows the image to stand out more and can fit a tight frame. A wide border gives the work dramatic presence and can transform a small image into a large piece. Whichever you decide is up to you, it is just a matter of personal taste. Here are examples of both styles:

NarrowWideMats

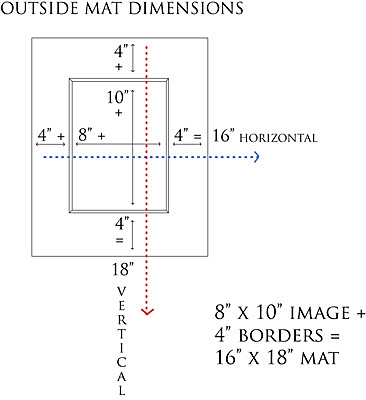
  • When you have this information, perform these two simple calculations, and you are ready to go: To get the outside dimension of the mat, add the horizontal dimension, the width of the mat and the width of the mat again. For example, if your image is 8″ x 10″, and you want a 4″ wide border, add 8 + 4 + 4 = 16″. Do the same with your vertical dimension, in this example – 10″ + 4 + 4 = 18″. So your outer mat dimension is 16″ x 18″.

OuterMat

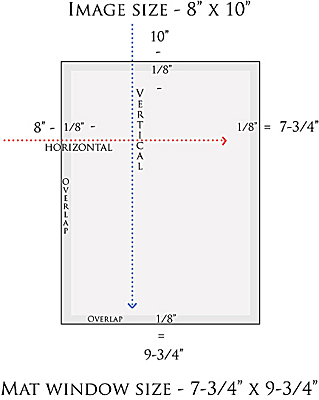
  • The second calculation is your window size. That is simply your image size, minus a slight amount for overlap. Since the window will cover the edges of the image, it needs to be slightly smaller than the artwork. We recommend a 1/4″ overlap, which will allow enough room for overlap and attachment to the back of the mat. In our example, with an 8″ x 10″ image, your window size would then be 7-3/4″ x 9-3/4″.

Print

With practice, this process becomes second nature, and can be quickly transformed into a host of eye-catching sizes for all of your pieces. Taking a little time to measure your own custom mats can save you much time when preparing your shows and matted prints. Which will then give you more time to do what you do best – creating!

The Benefits of Archival Mats

by David Heyman

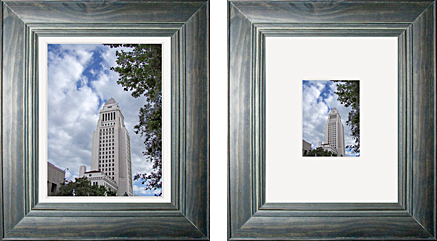
The function of a mat is to give breathing space around your artwork or photograph, letting the eye have a place to “rest” while taking in the image. A blank, neutral mat border surrounding the work adds class and transforms what could be a snapshot into a real work of art. Notice the transformation of this image from a plain poster frame, into a professional, gallery quality display, just by the addition of a mat.
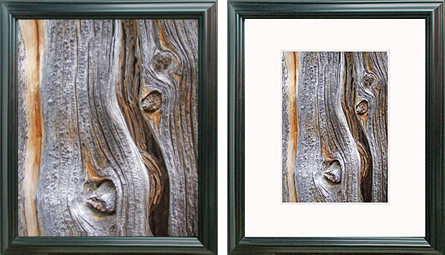
The image on the left looks like a decorative poster, while a mat instantly transforms it into a work of art.

The image on the left looks like a decorative poster, while a mat instantly transforms it into a work of art.

Mats come in many shapes, sizes, colors and textures. However, one crucial element  is often overlooked when selecting a mat: whether or not it is archival in quality.

The majority of mats on the market today are made from wood pulp, the same substance used to make mass-produced paper. While paper products made from wood pulp are inexpensive and abundant, their use in displaying and protecting artwork is limited, due to their rapid decay and discoloration.

Wood fiber contains lignin, an acidic substance that is a cellular component of trees. When that fiber is made into paper, including mats, the lignin remains in the finished product, making it a ticking time bomb for eventual disintergration.

Acid causes mats to yellow, staining your artwork in the process. Gone unchecked, a paper mat will eventually turn brown and become brittle, spreading acid burn on to your work. While substances can be added to the paper fibers to slow down the deterioration, they are temporary, and no mat made with wood pulp is suitable for archival use.  Look at the effects of a wood pulp mat on this photograph:

Notice the yellowing and discoloration on the image matted with an acidic wood pulp mat.

Notice the yellowing and discoloration on the image matted with an acidic wood pulp mat.

The finest mats are made with cotton, a fiber that is naturally free from lignin. 100% cotton mats will never yellow, turn brittle or damage your valuable work. Although initially more expensive than the imported mats made with wood pulp, Oak Creek Printworks Bainbridge Alphamats are a good investment, ensuring that your art is protected and will never be ruined by the careless addition of an acidic mat.

When choosing a mat for your work, never settle for “acid-free”. This is a term thrown about so often it has become almost meaningless. Anything can be labeled acid-free, but that doesn’t mean it will last. An acidic wood pulp mat that is sprayed with an akaline coating is called “acid-free”. Yet the acid in the mat will quickly overcome the coating, and it will have worn off even before the mat is used for diplay.

Here are some criteria to use when selecting a fine quality archival mat:

  • Is it made from wood pulp, “high alpha cellulose”, or 100% cotton?      Nothing is as stable and naturally archival as cotton.
  • Is the mat just “acid-free” or is it truly archival?    An archival mat never needs to be processed or coated to have acid removed, as there is no acid to begin with.
  • Are your mats imported from China, or made in the USA?   Don’t be fooled by offers of “acid-free” imported mats that are too good to be true. Our archival mats, in a bright white, cream, black and gray, are made in the US, and cut right here at our studio.

One quick way to check if the mats you have are truly archival  –  look at the bevel (the slanted cut right next to the window of the mat). Wood pulp mats start out with a yellowish core, which quickly turns brown, as shown in these photos. A cotton mat starts out with a bright white core.
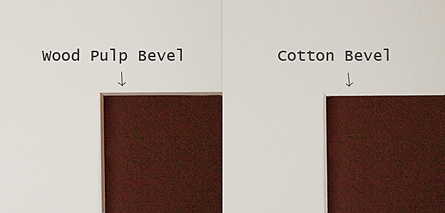
On a wood pulp mat, the bevels start out yellow, then quickly turn brown.

On a wood pulp mat, the bevels start out yellow, then quickly turn brown.

Your artwork is your passion. Never compromise or hurt your images with an acidic mat.

Art Fair Necessities: Learn from the Pros

by Georgia Lange

Last month I paid homage to the prestigious Beverly Hills art show known as the “Affaire in the Gardens”. This art show features over 200 nationwide artists and attracts up to 40,000 spectators every fall and spring since 1973. If you are a fan of outdoor group art shows and fairs, Affaire in the Gardens is top of the line. Even the Andy Gumps are swank at this renowned event.

The Affaire in the Gardens art show is almost too prestigious to be labeled an “art fair”; these individuals are not selling candles and clothing. In researching the exhibition guidelines, I learned that all wearable art and accessories (with the exception of jewelry) is strictly prohibited. Although this particular art show may be out of the traditional art fair league, no one can say that its magnificent display methods cannot be used as a model to other artists for other art shows.

How do these artists prepare for a show such as the Affaire in the Gardens art show; how were the booths set up? How was the necessary equipment acquired? What did each artist offer to promote his or her work? This article is specifically geared towards artists who may want to participate in the Affaire in the Gardens art shows in the future, and how one can prepare for application and participation. However, many of the principles discussed here could be applied to outdoor art shows other than the Beverly Hills art show. It is important to remember that every art show has different guidelines, and it is vital to do the research and examine the requirements before beginning the preparation process. Pay strict attention to deadlines and be at least partially prepared before applying, and remember that what applies to one show may not apply to another.

Click here to see full pdf article

The Art of Giving Art

by Georgia Lange

The holiday season is here, and many of us are struggling to find gifts for our loved ones. The solution to this problem is an easy one; the gift of art is priceless. In the past, I have often found myself hesitant to give my art as a holiday gift to a loved one. I was concerned that I was not valuing my own work, or that I was imposing my own sense of taste on someone else. I have come to the conclusion that this is nonsense. The truth is that people love collecting art, and when the art comes directly from you (it is your creation), it is truly special, unique, and personal. What could possibly be more valuable?

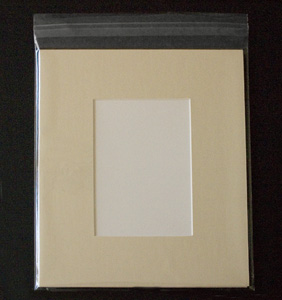
Prints make great gifts for anyone who is special to you. You can dress up your prints by matting them and placing each print in a protective plastic sleeve. Trust me; this is a classy gift and can be very cost-effective. Here at Oak Creek Printworks, we offer a package deal that includes the mat, back, and plastic sleeve. Depending on the size of the print, you can keep your costs under $20 per person (which is not easy to do! I usually can’t find great gifts for less than $30 per person, and even then it is difficult!). Ease your holiday headache; give art! You won’t regret it, and it will be a welcome gift to whoever receives it!

CreamMBBCombo

AN ADDITIONAL NOTE: EARNING THE MONEY TO SPEND ON YOUR GIFTS

Over Thanksgiving, I was surprised not only by the abundance of savory dishes that were prepared by friends and family but by the onslaught of inquiries as to how to purchase prints of my work for the sake of holiday gift giving. Remember: you have friends, and your friends have friends. Those friends give and receive gifts too. Since we tend to establish friendships with like-minded individuals, it is not surprising that our friends’ friends often have tastes similar to our own. Your art not only makes a precious gift for you to give, but for others to give too. This is a great opportunity for you to earn the money to spend on your gifts this season, and then some.

Establishing an online presence where people can view and purchase your work is extremely beneficial. Etsy, a site geared towards all things handmade, is a great way to set up your work for sales. Another great site geared towards artists selling their work online is Big Cartel. Check these sites out as soon as possible, and figure out what will work best for you. Then make the necessary phone calls and emails to your friends and acquaintances and let them know what a wonderful gift your art would make for someone they know, and where they can purchase it easily online.

Be kind this holiday season, and let the season be kind to you.


Ordering Greeting Card Sleeves

Protecting your greeting card artwork is easy with protective sleeves. However if your card size is not one of the standard* card sizes – A2, A6 or A7 – you may have some difficulty ordering the right size sleeve.

To be sure your card will fit, you can do what Shirley D’Agati did last month. Just send us a sample of your card and we will pick out the sleeve that fits your needs. We will then call you or email you with the final details of the order before we fill it.

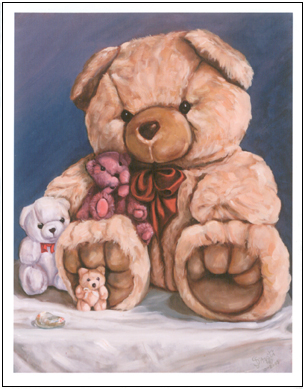
D'AgatiCard72dpi

“Big & Little”
Original Oil Painting on Canvas
by Shirley J. D’Agati


*Standard Card Sizes:

A2 Cards – 4.25″ x 5.5″
A6 Cards – 4.625″ x 6.25″
A7 Cards – 5″ x 7″

Standard Envelope Sizes:

A2 Cards – 4.375″ × 5.75″
A6 Cards – 4.75″ × 6.5″
A7 Cards – 5.25″ × 7.25″